Showing posts with label How-To. Show all posts

Friday, August 5, 2011

How To: Add a Quick & Dirty Aux Input to Your Dodge Grand Caravan (Factory Stereo)

This is a quick and dirty way to add an aux input to your 2002 or later model Dodge Grand Caravan (with a factory stereo). This really is a quick and dirty method, that leaves you with not much control over the input, but is nevertheless effective, and can be done in under 20 minutes, for cheap or even completely free!


However,
If you can, I highly recommend you use one of these methods to add an aux input to your stereo instead:


http://www.youtube.com/watch?v=294TFX3b5-A
(requires a CD changer, but is an elegant solution)


OR
buy a PIE CHRY02-AUX, which usually runs for about $42-$70, and is a much more elegant way to do this (and doesn't require a CD changer):


(If you choose to use the CHRY02-AUX, I recommend still following the Youtube video above for instructions on how to mount an audio jack into your dash. Just run the wires from the audio jack to the RCA inputs on the CHRY02 instead.)


..both of which will give you higher audio quality, let you turn the volume louder, and let you use your stereo's normal controls for your speakers.

However I'm assuming you're here either because you don't have a cd changer, don't want to buy one, or don't want to spend the money to buy a special adapter for your stereo. Well you're in the right place! This can be done for the cost of a simple 3.5mm audio cable (a few bucks), or completely free if you've already got one laying around.
--------------------

Before we get started, let's quickly go over the pros and cons of this method:
PROS:
-cheap, can be done for a few bucks or even for free
-easy, can be done either using soldering or splicing, whichever you've got the skills and tools for
-quick, can be done in under 20 min
-effective, works immediately and doesn't require much work to complete

CONS:
-stereo is completely bypassed, so control over volume, fading, etc is not available (all other inputs - CD, Radio, etc - will still work normally)
-can only output to front speakers or rear speakers, or both with the downside that fading controls won't be functional any more for other inputs
-volume can only be controlled at the source (output is decently loud from my iPhone, but you'll be dissapointed if you like to listen *really* loud
-sound quality is pretty good (waay better than an FM transmitter or a cassette adapter), but starts to degrade at higher volume levels

Read them? Good! Don't care and ready to start? Alright! Let's go...


Step 1 - Remove Stereo

  • Pull out the cup-holder. Remove the small plastic trim piece located directly above cupholder (just pull it).
  • Remove the two screws located under the trim piece that hold the main stereo panel in place (some vehicles may have two screws that need to be removed from the top of the main panel as well).
  • Remove the entire main stereo panel starting at the bottom by pulling until the clips release (some force is required).
  • Remove the four screws holding the stereo unit in place.
  • Remove all connecting cables from the back of the stereo, and remove the stereo itself.


What exactly are we doing here?
We are going to be tapping into the speaker outputs on the back of the stereo, either by soldering on to the corresponding pins on the stereo's main board, or by splicing into the corresponding wires in the car-side harness.


METHOD ONE - SOLDERING (if you plan to splice into the stereo connector in the dash instead, skip to method two)
Note: Soldering is a cleaner method than splicing, but requires you to open the stereo unit. Both methods take about the same amount of time in the end.

Click on any image to enlarge it.

Step 2 - Open Stereo


  • Remove the two screws holding top metal plate in place (the part with the sticker on it).

  • Remove the top metal plate (tip: pry from the back with a small standard screwdriver).

  • Remove the four washer/screws (two on each side) that hold the front plastic faceplate in place.

  • Remove the volume control knob (just pull).
  • Remove the front faceplate by releasing the six clips with a small screwdriver (two clips each on top and bottom, and one on each side). Tip: do the two top and bottom clips on one side, then that side clip, then repeat on the other side.


  • Remove the front faceplate carefully.
  • Remove the four side screws holding the right side heat-sink on. (Note: these images were taken after I completed this, so just ignore the wire for now.)

  • Remove the two top screws holding the right side heat-sink on.

  • Remove the right-side heat sink.


Step 3 - Solder Aux Input Wire

  • Get your 3.5mm audio cable, and cut one end off (if it is a 3.5mm to RCA cable, remove the RCA end).
  • Strip the insulation off the resulting wires, and twist the exposed wires (not to each other).
  • Use a multi-meter to check continuity to find out which wire is which:

There are three parts to the 3.5mm plug: the tip, the ring (the middle conductor), and the sleeve (the conductor at the base of the plug). The tip is Left Signal (or Left +), the ring is Right Signal (or Right +), and the sleeve is Ground (GND, Left and Right -). Test each of these with your exposed wires to find out which wire is which. Ideally you should use a two part cable (with two joined insulation pieces), which will leave you with two ground wires.


  • Using the pinout diagram on the top plate, or the image below, solder each of the four wires to their respective pins (Tip: add a little fresh solder to each of the pins on the board first, so that they solder easier). Use the pinout diagram or the image below to solder to either the front or back speakers (your choice), or both. Remember that if you choose to solder to both, you will loose fading (front to back) control for all your other inputs (CD, Radio, etc).
Note: the pins you are going to solder onto are located on the back right of the unit (as you face it from the back), under the heat-sink you just removed, and on the adjacent corner to the actual connectors on the back of the unit. The pins you are soldering onto are the other ends of the actual pins you see in the connector, at the location where they solder into the main circuit board. 

The column of pins you see on the left in the image below corresponds to the column of pins you'd see on the right as you look at the connector from the back of the unit; the column of pins on the right below corresponds to the column on the left as you look at the connector from the back of the unit (See the pinout diagram in Method Two below to help clarify).


Remember to route your cable through a slot in the heat-sink panel!


  • Follow the preceding instructions backwards to close the unit up, and install it back into your dash.
  • Run the cable down the fin of the heat-sink that it comes out in, so that it doesn't stick out on the side (and interfere with the stereo going back in). (Note: this image shows the cable running up, when it really should be running down).


METHOD TWO - SPLICING (this method is not as clean as soldering, and a bit more difficult to pull off (and easier to mess up), as you have to modify the wire harness while it's inside your dash. However it may be easier for those of you who have never soldered before (or shy away from the thought of opening up the stereo)).

Step Two - Splice Into the Car Stereo Harness

  • Using the pinout diagram on the sticker on top of the stereo, figure out which wires in the harness go to the right front signal (RF+), the right front ground (RF-), the left front signal (LF+), the left front ground (LF-), and so on for the right and left rear speakers. Below is the pinout diagram from my stereo (yours may be different).

  • Get your 3.5mm audio cable, and cut one end off (if it is a 3.5mm to RCA cable, remove the RCA end).
  • Strip the insulation off the resulting wires, and twist the exposed wires (not to each other).
  • Use a multi-meter to check continuity to find out which wire is which:


There are three parts to the 3.5mm plug: the tip, the ring (the middle conductor), and the sleeve (the conductor at the base of the plug). The tip is Left Signal (or Left +), the ring is Right Signal (or Right +), and the sleeve is Ground (GND). Test each of these with your exposed wires to find out which wire is which. Ideally you should use a two part cable (with two joined insulation pieces), which will leave you with two ground wires.


  • Using some cheap wire splices from Radioshack (these, or these have worked best for me), splice each of the wires from your aux cable into the respective harness wires for the front, or rear speakers (or both).

Remember that if you choose to splice to both, you will loose fading (front to back) control for all your other inputs (CD, Radio, etc).


FINISHING:

  • Route your audio cable under the dash (if it's long enough), through a hole you've made in the front stereo panel (if you want to do that), or under the front panel in the bottom where it screws in (what I did - it's quick and dirty, remember?).


You could always run the audio to a jack mounted in the dash, which would be nicer, but if you're going to spend the time and money on that, just go ahead and get a CHRY02-Aux and do it properly.

PLAYBACK:
Turn your stereo OFF, plug your iPod in, and press play! Control the volume using your iPod's volume control. Beware that this will work even with the car off and the keys out of the ignition, so watch out for leaving music on and running out your battery!


ANY QUESTIONS? Leave them in the comments, and I'll get back to you as soon as I can!
--------------------

I love hearing from you. If this was helpful to you in any way, please leave a quick comment letting me know!

Disclaimer: I make no claims as to whether following any of the above will work for you. I take NO responsibility for any damage it causes to you, your car, your car stereo, or any other resulting damage or injury from following these instructions.

Saturday, June 4, 2011

Recipe: Taco-Bell Crunchwrap Supreme

Probably one of the most amazing, useful, and delicious innovations to come from the fast food industry to date is Taco-Bell's Crunchwrap Supreme. It combines the convenience of a sandwich, the crunchiness of a taco, and the flavorful awesomeness of a burrito. On top of that, it actually manages to be more portable, more convenient, and less messy than a burrito itself (the undoubtable king of portable foods).

For those of you who have never had a crunchwrap yourselves, here is a description straight from Taco-Bell's website:
"A warm, soft, flour tortilla filled with seasoned beef (or beans), warm nacho cheese sauce, a crunchy tostada shell, reduced fat sour cream, lettuce and tomatoes and then wrapped up and grilled for maximum portability."


It really is so innovative that it doesn't deserve to be relegated to being simply a branded food - I believe it should be as common, and often-made as the burrito itself (and maybe even someday replace it). 
So to achieve this, I now present you with, complete and tested for tastiness, the (un)official crunchwrap supreme recipe:

--------------------

Part of the trick to getting this (and other Taco-Bell foods) just right is to cook it exactly how they do: for a very short time on a very high-heat, lightly oiled grill. Induction cookers are perfect for this, as they replicate the high power and efficiency of commercial grills, and cook very evenly. 


The instructions specified here should work fine with any 10 power setting, 1800 watt induction cooker (I used a Max Burton 6000). Normal heat settings are specified as well, in case you're using a normal stove. Be aware that cook times might be significantly longer on a normal stove.

Note: being a non meat-eater myself, I made this recipe based on the vegetarian version of the crunchwrap, which uses beans instead of beef. If you want to make a normal style crunchwrap, simply substitute the beans for beef in this recipe. I also chose to use real cheddar instead of nacho cheese, as I'm not exactly partial to the processed cheeses myself.

Makes: 2 crunchwraps

What You'll Need:
  • 2 - 12 inch or larger flour tortillas
  • 2 - pre-made 5" (standard) tostada shells
  • 3/4 cup refried beans
  • 1/2 cup finely shredded cheddar
  • 1/2 cup finely chopped romaine (thin strips)
  • 1/4 cup diced tomatoes (1/4" pieces, use a firm tomato and drain any juice)
  • 1/4 cup sour cream (normal or reduced fat)


Instructions:

Set-up & Tips:
  • Your tortilla needs to be about two inches more than twice the diameter of your tostada shell. For example, for a 5 inch (normal) tostada shell, you should use a 12 inch tortilla. As all I had were 8 inch tortillas when I made these, I cut my tostada shells down to 3 inches using a sharp knife. As a result, I had sort-of "mini crunchwraps", so don't judge the size of your crunchwrap based on my pictures.
  • As the cheese needs to go nearest to the outside, and beans don't spread well on cheese, it works best to spread the beans on the tostada shell rather than the tortilla. Pre-heating the beans will also make them easier to spread, and help to melt the cheese (just zap them in the microwave quickly).
  • If you plan to use beef, invert the instructions below, and sprinkle the cheese then the meat onto the center of the tortilla first instead.
  • If you really want to do everything properly, add 1/2 Tbsp water to your sour cream, and put it into a condiment squeeze bottle for easy application.
  • WARM the tortilla for about 15 seconds in the microwave right before using it, so that it doesn't crack when you fold it.

Assembly:

     1. Spread a little over 1/4 cup of beans on your tostada shell, so that you get an even layer to the edges, just under 1/2" thick.


     2. Sprinkle about 1/4 cup of cheese over the beans, again to the very edges of the shell.


     3. Place a warmed flour tortilla centered over the tostada shell, and reaching under and supporting the shell, invert the whole assembly.


     4. Squeeze or spread a thin layer of sour cream over the exposed tostada shell.


     5. Spread about 1/4 cup lettuce over the sour cream.
     6. Spread 1/8 cup tomatoes over the lettuce.


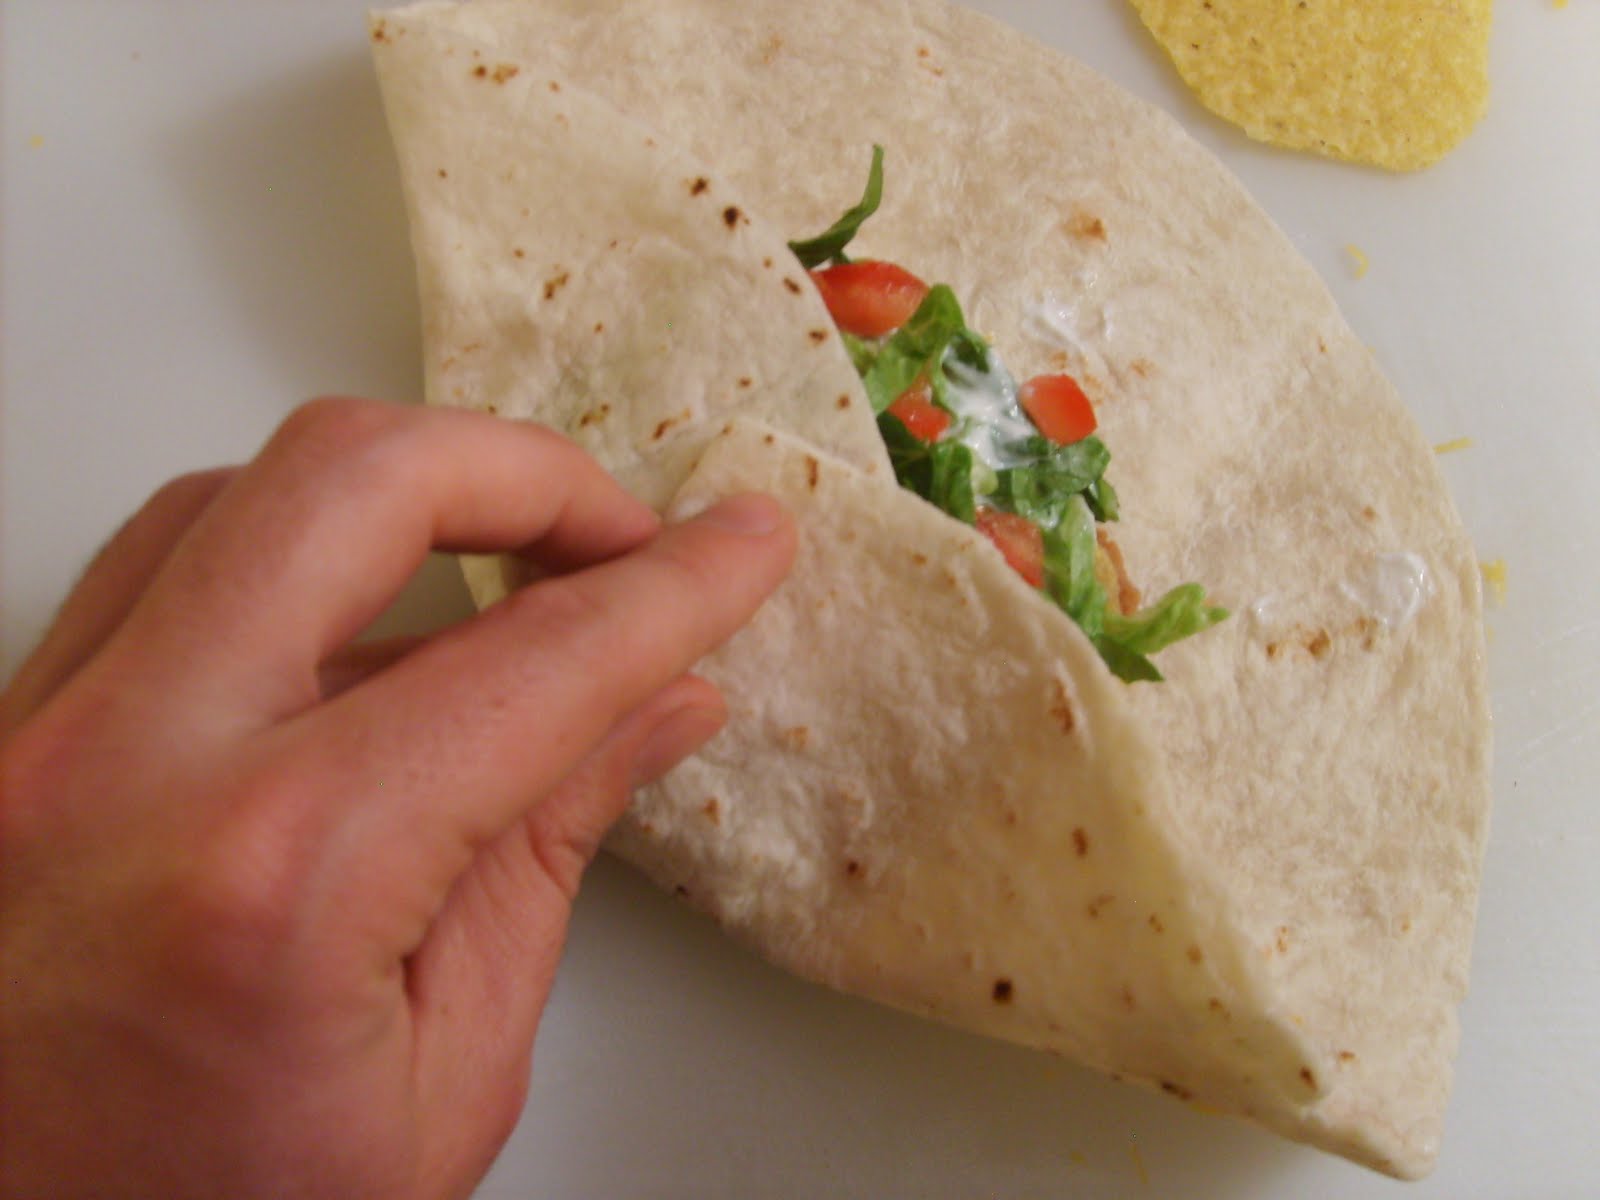
Folding:

Now comes the tricky part. This may be a little difficult at first, but follow the instructions and pictures, and you'll get the hang of it pretty quickly.

     1. Fold one side of the tortilla as far as it will go over the other ingredients.


     2. Using your fingers, make the next fold just like the last, while tucking the extra tortilla under the fold.


3. Continue folding like this until you reach the very end, where there is a single triangular flap left.


     4. Fold this final flap closed.


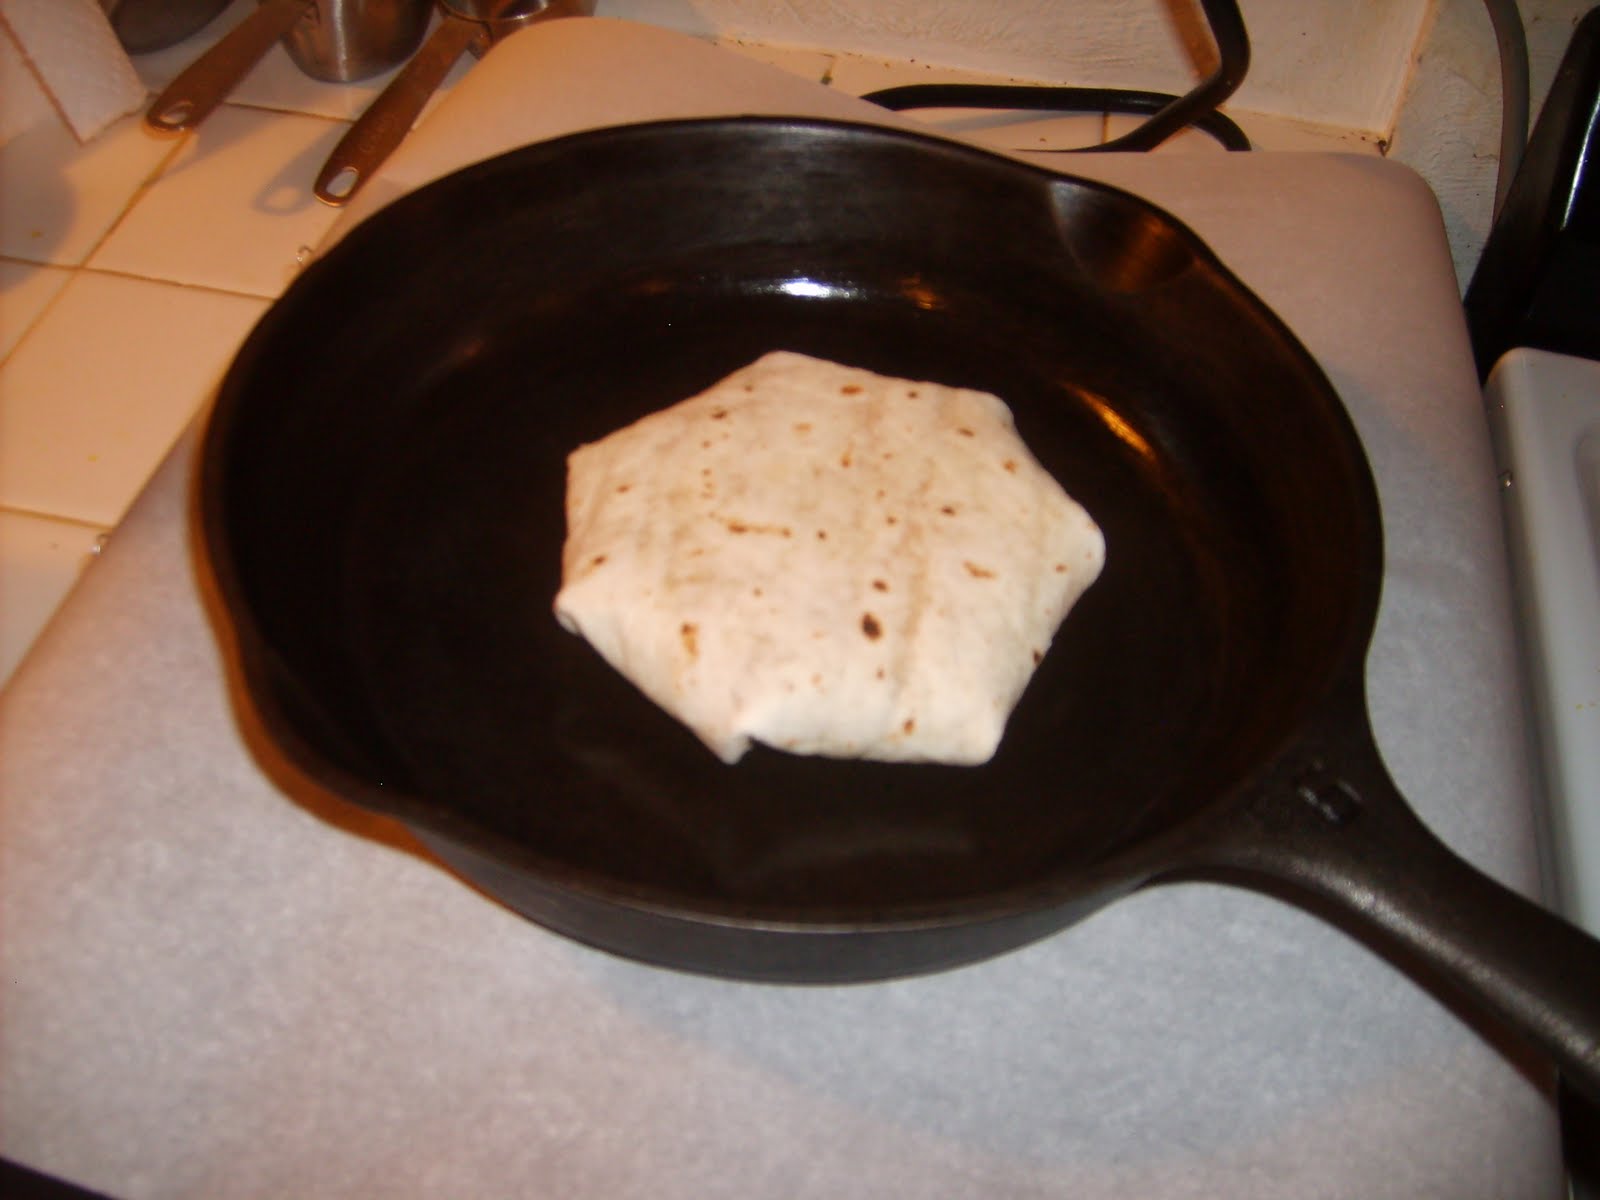
Cooking:

     1. Using a folded piece of paper towel, lightly grease a 12 inch skillet (cast iron works great).
     2. Preheat skillet to power level 5 (medium high on a normal stove), until oil begins to bead.
     3. Turn to power level 3 (high side of medium), and place folded crunchwrap right-side up in pan.


     4. Using a smaller skillet (or other heavy food-safe object), press crunchwrap firmly into the pan. Turn as soon as it becomes evenly brown (about 30 sec).


     5. Use smaller skillet again to press other side into pan until nicely brown (again about 30 sec). You might want to quickly re-oil the pan before doing this.

     6. Remove, let cool, and enjoy!


--------------------

For another great induction cooked Taco-Bell imitation recipe, go here.

For more info on induction cooking, and a recommendation for a specific unit that's best as an intro to this new method of cooking, check out my post here.


I love hearing from you. If this was helpful to you in any way, please leave a quick comment letting me know!

Disclaimer: I don't own or have any relation to Taco-Bell, or any of it's brands or trademarks. Any names, trademarks, or designs used here are only used as testaments to the quality and innovation of the originals. Any images displayed here are the property of their respective owners. If you are the owner of an image used and would like it removed, please contact the author of this post.

Saturday, May 28, 2011

Recipe: Taco-Bell Style Quesadillas

This is a recipe for cooking Taco-Bell style cheese quesadillas, specifically including cooking instructions for using induction cooking.

Part of the trick here is the sauce, and part of it is in how you cook it. I myself used my new induction cooker, which is perfect for this sort of thing as it can cook things very quickly and evenly, which is what we're trying to emulate here. It should work fine on a normal stove too though.


The sauce recipe is an amalgamation of a few recipes from across the web, some guessing based on the ingredients list at Taco-Bell's website, and my own assumptions and variations. It turned out really good!


I know there are several recipes on the web for this already. I decided to post my own variation because the other recipes are for chicken quesadillas, and being vegetarian myself I wanted a recipe for the cheese quesadillas; because the other recipes online use American cheese, and I'm not exactly partial to the processed cheeses myself; and because I felt I could add something by changing a few ingredients, and specifying more clearly the exact cooking procedure needed to get the same crisp, evenly cooked outside, which is a large part of making a quesadilla similar to Taco-Bell's.


--------------------

The instructions specified here should work fine with any 10 power setting, 1800 watt induction cooker (I used a Max Burton 6000). Normal heat settings are specified as well, in case you're using a normal stove. Be aware that cook times might be significantly longer on a normal stove.

Makes: 2 half quesadillas (with leftover sauce)

What You'll Need:

Sauce:
  • 1/4 cup ranch dip OR mayonnaise (either will work fine, and you can even use 1/8 cup of each)         ---vegenaise also works fine
  • 2 tsp chopped pickled chilies or jalapenos
  • 2 tsp pickled chili or jalapeno juice
  • 3/4 tsp sugar
  • 1/2 tsp garlic powder
  • 1/2 tsp paprika
  • 1/4 tsp cayenne pepper
  • 1/4 tsp cumin
  • Optional: 1/4 tsp chipotle powder
  • Salt to taste
Quesadillas: 
  • 2 wheat tortillas
  • 1/4 cup shredded monterey jack cheese
  • 1/4 cup shredded cheddar cheese
  • 1/4 cup finely shredded fresh parmesan, asiago, or romano cheese (I can't vouch for how good the canned powdery stuff will taste)
  • Cooking oil (I used olive)

Instructions:

Assembly:

     1. Stir all sauce ingredients together until well mixed and smooth.
     2. Mix cheddar and monterey jack cheeses together.
     3. Spread about 1-1/2 Tbsp sauce on half of a tortilla (a good even layer).


     4. Sprinkle about 1/4 cup cheese mix on top of sauce (again, a good even layer).
     5. Sprinkle 1/8 cup parmesan, asiago, or romano cheese on top of other ingredients, and fold to close.


Cooking:

The trick for cooking these right, so that they're just crispy on the outside, and just melted on the inside, is to cook them just how Taco-Bell does it themselves: for a very short time on a very high-heat, lightly oiled grill. Induction is perfect for this, as it replicates the high power and efficiency of commercial grills, and cooks very evenly. Normal stoves should work just fine as well though.
  1. Using a folded piece of paper towel, lightly grease a 12 inch skillet (cast iron works great).
  2. Preheat skillet to power level 5 (medium high on a normal stove), until oil begins to bead.
  3. Turn to power level 3 (high side of medium), and place folded quesadilla in pan.
  4. Turn as soon as quesadilla begins to brown (about 30 sec).
  5. Once other side is brown (30 sec again), use a spatula to bring the uncooked edge of the quesadilla to the center of the pan, and hold for about 20 sec. Repeat on other three sides, so that quesadilla is evenly cooked all around.

     6. Remove, cut with a pizza cutter, sharp spatula, or knife and enjoy!


--------------------

For another great induction cooked Taco-Bell imitation recipe, go here.

For more info on induction cooking, and a recommendation for a specific unit that's best as an intro to this new method of cooking, check out my post here.


I love hearing from you. If this was helpful to you in any way, please leave a quick comment letting me know!

Sunday, May 15, 2011

How-To: Use Textfree and Google Voice for free calls

So, first post. I just picked this because it's short(er), and I want to get to sleep.


This is a simple way to set up the GV and Textfree apps to allow you to make free calls anywhere you have internet service. This is only relevant to anyone with an iPhone, iPod touch, or iPad, who is already using the Textfree app and/or prefers it for making calls. Otherwise this functionality can be replicated using this app here.
--------------------

The Textfree app is a cool, useful app that allows you to send and receive texts for free, and receive calls for free. However, to make calls, you have to purchase minutes via in-app subscription.

Google Voice is a useful tool that allows you to have a single number you give out that, when called, rings any number of different phones. In addition it can ring these phones based on profiles such as who's calling, or what time it is. It also has other neat features such as voicemail transcription and call recording.

Google Voice, it turns out, works as a simple workaround for the issue of needing to pay for minutes to make outgoing calls using Textfree: once you add a forwarding phone to your account, it can be used to make outgoing calls by first connecting to that number, then to the number you're calling. This effectively makes any call initiated by the Google Voice app an incoming call to your Textfree number, rather than an outgoing one.

To get this set up, first go download the Textfree and Google Voice apps from the app store:
Textfree
Google Voice
Next, set up an account with Textfree, and choose a phone number. Then go and create a Google Voice account. Log into your GV account on a browser (here), and click the small gear icon in the upper right corner, and click 'Voice Settings'. Next click 'Add Another Phone', and add your Textfree number as a new forwarding phone. Follow the instructions to set up and confirm the new number. Finally, open the GV app on your phone, go to Settings, and set the 'This phone' setting to "Don't use for calls".

That's all! To use your new setup for outgoing calls, open the GV app on your device, and use the dialer to call anyone you like. When it asks which phone to use, pick your Textfree number. You'll then get a popup saying a call is coming in, and click 'Answer'. You'll be transferred to the Textfree app, where you'll then be connected with whoever you're calling for free!
Important: Make sure push notifications are enabled for both apps for everything to work properly.
--------------------

Learn how to make this more useful by switching your iPhone to a data only plan! Make and receive all your calls using the internet, and pay only $15 a month instead of upwards of $70!
Coming in my next How-To: Using an iPad sim to get data and calling for only $15 a month


I love hearing from you. If this was helpful to you in any way, please leave a quick comment letting me know!


Disclaimer: I make no claims about the functionality of this workaround. "Free" applies to US calls only, and may change at any point. Google will charge it's applicable rates for international calls.